Category Archives: Lunch/Dinner

Simple Lunch

Standard

Asian food here is very different as I know it. The other day I attended a Studio Ghibli Festival Gala at Mannheim. We just wanted to watch the movie “the Legend of Princess Kaguya” but the standard screening was sold out so we bought tickets to the gala which includes a glass of champagne, cosplay competition, Japanese buffet and the movie. My husband had said it will just be sushi. Naively, I pointed out to him that it stated “Japanese buffet”, not sushi buffet. Well, he was right and I was disappointed. I was dreaming of gyozas, assortment of Japanese desserts, yakitori and all that. Ho hum.

And so I’ve begun to wonder what folks think of, if I were to say Chinese food. Here is what I cooked for my toddler and I for lunch yesterday. The lunch consists of garlic stirfried bokchoy, black sesame tuna omelette and buttered tomato rice. Is it very different from what you would have imagined?

IMG_3385.JPG

Would anyone be interested to learn how to make such simple home cooked fares? 🍀

30 Min Homemade Rye Pizza

Standard

These days, with a picky toddler, pizza can be my best bet sometimes. Today’s lunch was one of those days. It was not planned for so I wondered if there is such a thing as a quick pizza dough. It turned out to be a very positive “yes”. This pizza from start to end took me 30 minutes. I have substituted the bread flour with rye flour. My toddler did not mind it 🙂 I think it has to do with the salami. Oh boy, I have to tell myself, too much of a good thing is really not good. Don’t mind the weird shaping too!

IMG_3189.JPG

The dough recipe is adapted from Allrecipes. The serving size can be changed at the Allrecipes link so you can double, triple, quadruple the amount of dough 🙂

Makes 1 small pizza (Enough to feed a toddler and an adult)

Ingredients
For the dough
3g dry yeast
1 tsp sugar
60ml warm water
85g rye flour/bread flour
1/2 tsp salt
1.5 tsp olive oil
For the sauce
1 tomato, pureed (with blender)
1 tsp pizza herbs/oregano
2 tsp olive oil
For the toppings
Sliced salami
Shredded cheese of your choice
Toppings of your choice

Breadcrumbs and extra flour for dusting

Method
1. Preheat oven to 200 degrees Celcius (with fan). Gather all dry ingredients for the pizza dough and place them into a medium bowl. Stir in water and oil until a smooth dough forms. Leave it for 5 mins.
2. Prepare baking tray by sprinkling a handful of breadcrumbs all over. Prepare sauce by heating up a small saucepan and adding in olive oil. Add in the pureed tomato and herbs and bring to a boil. Simmer for 2-3 minutes till it thickens. (It’s a fairly fast process)
3. On a floured surface with floured hands, pat out the dough. If the dough looks wet and sticky sprinkle some flour over it for better handling. Pat it out as thin as possible and transfer it to the baking tray. Place the dough on top of the breadcrumbs.
4. Spoon/spread the sauce all over the dough, leaving a 1 cm or 1/4 inch border on the sides. Sprinkle as much cheese as you would like and the toppings of your choice. Bake in preheated oven on the higher rack (mine as 4 racks, I used 2nd from top rack) for 10 – 15 mins or till the cheese has melted and turn light golden brown.

That was today’s QUICK and yummy lunch 😉

Pineapple Fried Rice

Standard

One of my favorite dishes to order at our favorite Thai restaurant back in Singapore was pineapple fried rice. I have yet to see this dish on the menus of the Thai restaurants here so I have decided to give try making pineapple fried rice last week.

IMG_3127.JPG

The recipe is adapted from the blog, Guai Shu Shu. I referenced the cutting of the fruit from about.com. The detailed instructions and pictures helped a lot. And for me, a serrated knife/bread knife is the best choice not only for outside but to cut out the insides of the pineapple too. I used a regular spoon to scoop everything out and reserved the amount I needed for the fried rice while the rest went into a fruit salad. Please do not fret about getting perfect cubes out. It didn’t happen for me either.

Ingredients
2 shallots/1 small onion, finely chopped
1/4 cup raisins
1/2 cup cashew nuts
1 cup frozen green peas
1 chicken breast, cut into small cubes, lightly coated with cornflour
2 cups cooked white rice (leftover rice or freshly cooked but with slightly less water than usually called for)
1 cup pineapple cubes, with juice
1 loose tablespoon turmeric
3 tbsp fish sauce
1 tbsp soya sauce
Water
Cooking oil

Method
1. Heat a wok with medium high heat for 2 mins. Swirl in 2 tablespoons of oil. Once the oil is easily spreadable and forms “lines”, shallow fry the cashew nuts till golden. Scoop up, drain and set aside.
2. Let the wok reheat for 1 minute. Add in chicken cubes. Sear the chicken till light golden brown on both sides before removing. Sear for 1 minute on one side and flip it over with the spatula for the other side. Scoop up, drain and set aside.
3. Add 1 tablespoon of oil into the wok. Add in the shallots. Stir fry till fragrant before adding in the turmeric powder. Mix the turmeric and let it mingle among the shallots. Add in the rice. Add at this point the pineapple juice and a dash of water (about 2-3 tablespoons). Quickly push down the spatula and flatten and spread the rice. Stir fry, flatten and spread is the continuous action until all the rice are coated yellow. The juice and the water helps moisten the rice and increase the spreadability of the rice. It also helps to continue cooking the rice to render it al dente. At this point, the moisture should have nearly all been evaporated.
4. Once coated, add in the sauces, chicken, pineapple cubes and peas to mix. Stir fry and toss vigorously to get everything evenly mixed together. Once everything is heated through, add in the raisins for a couple of final tosses. Switch off the heat. Carefully fill up the pineapple boat with the fried rice and garnish with your choice of topping, coriander or store bought crispy shallots.

*Note: For the rice, I made it fresh on the day itself. Cooked the rice one hour earlier using 20% less water and once done and flaked, I let it air until I am ready to use it.
** Note: When preparing the pineapple boat, it is better to rinse the whole pineapple under water as there are always small bits everywhere.
***Note: If one prefers to have some heat in the fried rice, do add in a sliced chilli or two together with the peas.

Broccoli with Egg Sauce

Standard

When I made the dish, Three-Cup Chicken (click here if you would like to see the recipe of Three-Cup Chicken), I also made a vegetable dish to go with it. It’s a standard practice for me. Something for protein together with something green. That night, I was inspired to try broccoli with egg sauce.

IMG_3148.JPG

Ingredients
1 small broccoli, trimmed to florets
1 egg, beaten
Chicken stock granules
Water

Method
1. Fill a pot with enough water to blanch the broccoli in. Bring to a boil and add in broccoli. Boil the broccoli until it has cooked to the consistency of your choice. We cook it a little bit after al dente as it is the preference of our child. That would take about 4 minutes. When unsure, fish one floret out and take a bite.
2. Once done, remove broccoli and pour away the water. Reserve only enough water for the amount of sauce you would want to have. To the same pot, add in chicken stock granules, amount per packaging instruction. I added a teaspoon.
3. When the stock returns to a boil, pour in the egg. While pouring slowly, use a fork to swirl the egg in the water. If you prefer to thicken the sauce more, dissolve a teaspoon of cornstarch with a teaspoon of water and add in. Stir to make sure the starch is incorporated. Turn the heat off.
4. Arrange florets on a circular pattern. Once a circle is established, add the florets on top to make a mini well. Pour egg sauce in the middle and serve.

Note: I did not use any extra salt in the sauce. If you prefer, do add salt or soya sauce per preference. I did not as the other dish was very flavorsome. I wanted something to balance things out.

Homemade Naan Bread with Yellow Lentil Dal

Standard

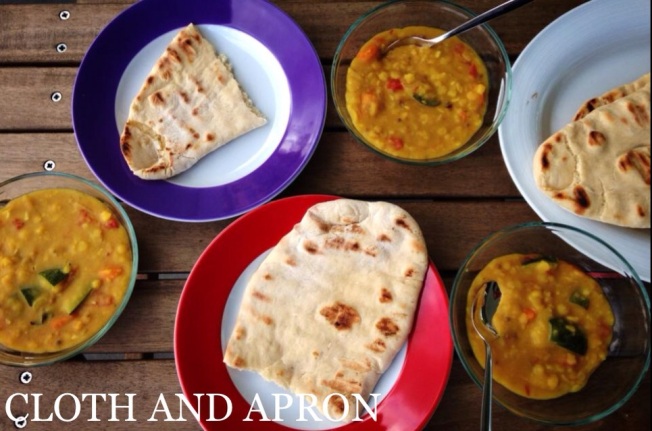
Growing up in Malaysia, my childhood breakfast favourite is roti canai with dhal and sugar. It sounds weird but it is a favourite among many children and for some, their baby steps into the world of spices and curry. It is not surprising therefore that I occasionally still crave for something similar. Since getting my Kenwood Chef kitchen machine and the recipe book that came with it, I have been trying my hand with making bread with the recipe provided. The results have been very promising and confidence boosting. The other day, I saw that the Kenwood recipe book has a recipe for naan. Now, I love naan too, as much as I love my fluffy roti canais and capatis. So it was destined that we will be going to have naan that night. To serve naan, I needed something to go with it and I had immediately thought of dhal, a yellow lentil curry. With a bit of help from Google, I found a great recipe from the Food & Wine website.

IMG_2603.JPG

With much appreciation to Kenwood for empowering me in the kitchen and the Food & Wine webby for helping me along the way, I am going to write down the adapted recipes here. This blog has served as a wonderful recipe storage for me until now.

For the Naan Bread (Adapted from Kenwood Recipe Book for Kenwood Chef & Major, by Jennie Shapter)

This makes 6 pieces of naan bread

Ingredients
450g bread flour or Flour 1050 in Germany1 tsp salt, I used Himalayan pink salt
7g dried active yeast
5 tbsp plain yogurt
1 tbsp melted butter (about 15g)
Approximately 210ml warm water
4 tbsp melted butter, for brushing on naan later (about 60g)

Method
1.  Put in flour, salt, yeast in a large bowl. With a wooden spoon, stir in yogurt and melted butter (1 tbsp).  Slowly mix in water (not all but just enough, so do not pour everything in) to form a dough. If you are using a kitchen machine, use the dough hook to do this work.
2. Let the machine knead until the dough is smooth and springy. If you are kneading by hand, transfer the soft dough onto a floured surface and knead until you get the same consistency. Once done, place in bowl and cover with a kitchen cloth/cling film and place in a warm area. I left it to rise in my oven with the light switched on as it was 22 degrees Celsius. Let the dough rise until it is doubled in size, about 1 hour.
3. Preheat the grill to 200 degrees Celsius. If you plan on using the oven, preheat it to the same temperature but place it nearer to the heat element to get the char. Prepare baking sheets as required. Alternatively, once the naan as fluffed up, grill it on a very hot grill or pan.
4. Punch down the risen dough and knead it for few times. You can use the dough hook for this too, letting the machine knead for 30 seconds. Transfer the dough onto a floured surface and divide the dough into 6 balls. Working quickly, roll out the balls one by one. Roll it out to a longish shape, about 0.5cm thick. Roll out the dough as you need it. Cover up the rest with a cloth or cling film. Brush melted butter on the dough before baking/grilling.
5. Transfer the dough into the grill or oven. If using an oven, then bake it on a lined baking sheet. Please do not cluster bake. One baking sheet at a time. Bake/grill till puffed up about 4-5 minutes. Flip it to get an even char on each side.
6. Serve immediately.
(Note: We have used our gas grill for cooking the naan bread and the results have been wonderful)

For the Yellow Lentil Dal (Adapted from Food & Wine. For original recipe, please click here)
Ingredients
1 cup toor dal, yellow split lentils
4 cups chicken stock
2 tbsp fresh ginger, grated
1/2 tsp turmeric powder
1 medium zucchini, unpeeled and cut into 3cm long pieces
1 medium carrot, peeled, halved and cut into 1cm thick slices
Salt, for seasoning
2 tbsp cooking oil
1 1/2 tsp mustard seeds, black if possible, I used yellow ones
1 small onion, thinly sliced and halved
2 pips garlic, thinly sliced and chopped
Sliced fresh chili of your choice, seeded or deseeded (Optional) – I have left this out as I am feeding a toddler
2 tsp cumin powder
5 dried curry leaves
Handful of cherry tomatoes or 1 large tomato, deseeded and chopped

Method
1. Boil lentil, 3 cups of chicken stock, minced ginger and turmeric together in a medium pot. Simmer for 20 minutes until lentils are soft, partially covered. Stir often as the lentils will stick to the bottom. 
2. Using an immersion blender, partially blend the lentils till the whole mixture is slightly thickened. Or blend 1 cup of the mixture in a blender and mix it back together after blending. Add in the remainder cup of the stock and the vegetables. Season with salt. Simmer for 15 mins.
3. Meanwhile, heat a frying pan till hot. Add in the oil and mustard seeds. When the mustard seeds begin to splutter, add in onions. Cook till softened. Add garlic and chilli (if using). Saute for 1 minute before adding in the cumin and curry leaves. Once fragrant, add in tomatoes and cook till tomatoes are soft.
4. Stir in the tomato mixture into the dal. Simmer for another 5 mins. Taste and season accordingly. Serve.

I am very happy to have discovered these two recipes as they are both favourites of mine. There will be many repeats of these in future 🙂


Fuss-free Fish Pot Pie and Cheesy Sticks

Standard

This is another of my quick lunches that I dished out while trying to entertain my toddler. This is very easy and very quick to assemble with a bit of planning ahead for the thawing, of course! I came to this idea while looking in my fridge and freezer on what I have on hand. And I love pies. Although that doesn’t mean I’m good at making them but I’m learning something new everyday…

IMG_2525.JPG

And of course, thank you very much for the invention of ready made puff pastry!

Ingredients
For the fish pot pie (Makes 2 ramekins):
1 fillet of any white fish (about 110g), thawed – Use more if you like
1 cup of chopped spinach, thawed
1/2 cup of cheese of your choice, (grana padano, parmesan etc)
Juice of half a lemon
Seasoning to taste (Salt and pepper)
Frozen puff pastry, prepare per direction on packaging (Try to buy puff pastry sheets that you do not need to roll out)

For the cheese sticks:
Puff pastry, cut to strips
Pizza herb mix or herb mix of your choice
Cheese, grated

Equipment
2 ramekins
1 baking tray with baking paper

Method
1. Preheat oven to 180 degrees Celcius. Cut the thawed fish into cubes. Squeeze water from spinach either using a sieve and a spoon or your bare hands. Divide fish, spinach and cheese between two ramekins.
2. Season with salt and pepper and a dash of lemon juice. Stir the contents of the ramekins to get the seasoning and lemon juice incorporated.
3. Cut puff pastry to required size so that you have a lid to put over each of the ramekins. Use a sharp knife and cut using clean cuts. Do not saw. Cover ramekins and use fingers to press down the pastry to the side of the ramekins to seal.
4. For the cheese sticks, cut the remainder of the puff pastry into strips. Transfer them to a baking tray that is prelined with baking paper. Sprinkle pizza herbs and cheese over. Place ramekins on to the baking tray, if there is still space.
5. Put both pot pie and cheesy sticks in oven to bake for 20 mins or till the pastries are all puffed up and golden. Remove from oven and serve.

Happy puffing 🙂

Chicken Char Siew (Chinese BBQ Meat) Noodles/ 鸡肉叉烧面

Standard

I have been craving for this for a while now so this thing has been on my list for as long too. I had much hesitation over it as I am not good with meats and char siew sounds terribly daunting to make. This week, I finally buckled up the courage to attempt it. It was turned out to be the most delicious char siew I have for a long, long time. By the way, in case you are wondering why it isn’t red, it is because I did not use any red coloring. I think it is really not necessary despite it being tradition.

I am very glad to have discovered Lily’s Wai Sek Hong and her recipe for char siew. Without this recipe, I would not get to feast on these wonderfully yummy noodles with the most succulent and flavorful char siew.

IMG_2524.JPGFor this recipe, I used a whole chicken breast so there was plenty of char siew to go around for 2 adults and a toddler. The char siew recipe is adapted from Lily’s Wai Sek Hong. Click here for the original recipe.

Ingredients
For the Char Siew
500g chicken breast
Marinate with:
2 1/2 tbsp oyster sauce/hoisin sauce
2 tsp soya sauce
1/4 cup brown sugar
1 tbsp wine, I used red wine
1/2 tsp chinese five spice powder
1/4 tsp salt
Dash of pepper
Glaze the char siew with:
1 tbsp dark soya sauce
1 tbsp honey
1 tbsp oil
For the garlic oil vegetables
2 romaine lettuces or greens of your choice, washed and cut
2 pips garlic, peeled and sliced thinly
3 tbsp of oil
Water for boiling
For the noodles
Asian noodles of your choice, preferably wanton noodles or thin egg noodles
Sauce to go with noodles (per portion):
1 tbsp kecap manis
1 tbsp soya sauce
1 tsp sesame oil
Dash of white pepper

Method
1. Prepare marinate by putting all marinate ingredients in a bowl and stirring it with a spoon to mix well. Place chicken meat in a container or a bag and cover it with marinate. Refrigerate the meat and marinate overnight. I marinated mine for 2 nights.
2. Preheat oven to 200 degrees Celcius. Place meat and marinate in a roasting pan and cover it with foil. Bake for 20 mins. Remove foil and continue baking untill the gravy has thickened and is coating the meat. Remove from oven and brush the glaze generously all over the char siew. Grill the char siew for 5 mins to give it a shine. Once done, remove from oven and let it sit for 5-10 mins before slicing.
3. While waiting for the char siew to cook, heat oil and fry garlic till golden and crispy in a saucepan. Pour everything into a bowl and set aside. Using the same saucepan, fill it up with water till 3/4 full. Bring water to boil and blanch cut lettuce for 1 min. Remove lettuce and set aside. You may season it if you prefer to. I do not as the lettuce will derive flavor from the noodles later.
4. When the char siew is done, prepare noodles per instructions on the package. I used the same saucepan with the water used for blanching lettuce. Prepare as much noodles as you need. While the noodles are cooking, prepare the sauce by putting all sauce ingredients into serving plates. The portion stated is enough sauce for 1 serving of noodles. If you have 2 persons eating, prepare the same sauce amount for every serving plate. Once noodles are done, scoop onto the prepared plates with sauce. Toss well to get the sauce coated in every strand of the noodles.
5. To plate up, arrange lettuce leaves at the side of noodles. Drizzle with garlic oil and get some of the crispy garlic on it too. Arrange sliced char siew on top and drizzle gravy from the roasting pan all over the char siew. You can also serve the remainder of the char siew gravy for those who would like an extra helping of the gravy.
6. Once done, grab your chopsticks and enjoy 🙂

Teriyaki Salmon with Butter Couscous and Pak Choy

Standard

I always need ideas to prepare quick, easy and healthy lunches since we are usually hungry when we trudge home from the playground. So I have decided to write down all my successful “inventions” here as a record. By the way, I find that when I write down recipes they stay in my head longer too!

This, here, is a simple one that consists of the basic components that makes up a balanced meal, protein, carbohydrates, vitamins, mineral and fiber. Oh and good fats as well 😉 You can probably chop up the pak choy and fish to mix it all up with the cous cous and end up with an oriental cous cous salad!


IMG_2453.JPG

This serves 1 adult (My bub eats from here too)
Ingredients
1 fillet of salmon, thawed to room temperature if using frozen fish
A bunch of pak choy or greens of your preference, washed and trimmed
150g couscous, prepared per instructions on the packaging
A dollop of butter
Water for boiling
1 tbsp oil for pan frying

For the teriyaki sauce (Adapted from The Daring Gourmet)
1/4 cup soya sauce1/8 cup brown sugar
1/2 tbsp honey
1 1/2 tbsp mirin
1/2 teaspoon sesame oil

Method
1. Put in all ingredients for the teriyaki sauce in a small saucepan and let it come to boil. Lower heat a notch down to bring it to a small simmer and let it simmer for 2-3 mins till the sauce thickens and lightly coats a spoon.
2. Fill a saucepan half full with water. Bring water to a boil and put in pak choy. Submerge the pak choy in the water and wait till the water starts boiling again. Quickly remove pak choy from the water. Alternatively for a more crunchy pak choy, just blanched it for 1 min.
3. Prepare cous cous per instruction on package. Here I used the water from cooking pak choy and added a dollop of butter before covering it up and waiting for 5 mins. Then I fluffed it up with a fork.
4. While waiting for the couscous, heat a frying pan on medium high. Make sure it is hot. Add in the oil. Sear the salmon. 2 mins on each side. Once you are sure the salmon is cooked and there is a golden brown sear on each side, dish up. Pour the teriyaki sauce over it. Serve.

Food is ready! Guten Appetit!

Thai Minced Pork Stir Fry with Holy Basil (Krapow Moo)

Standard

Ever since stepping foot on Thai soil back in 2006, I fell in deep love with this dish. I could remember eating it for days in a row for breakfast at a small bakery cafe in Krabi. This is also the dish my husband and I would order every time, in Thailand or in Thai restaurants wherever we are. Thanks to Leela from She Simmers, I have finally been able to recreate it to the way we love it.

Here, I’ve plated it the way we get them in Thailand or authentic Thai restaurants.

20140727-223244-81164286.jpg

The only problem I had was not having enough sauce, which is a fault of mine rather than the recipe. I would pay more attention and retain more sauce next round. I’ve also added chopped French beans to the mince. Just add them in after the meat and continue with the recipe. The French beans should be cooked yet crunchy. For the recipe please click here.

It brought me back to the wonderful country of Thailand and one of my favourite restaurants in Singapore. I hope this dish will do the same for you too 🙂

Pan-fried Jiaozi (Chinese Dumplings)

Standard

Dumplings are the best things ever. Every culture have their versions of dumplings. This proves that they are unanimously the most perfect invention of enjoying mouthfuls of flavours and textures delivered conveniently in a wrapped package from plate to mouth. The problem is the ones that we have came to love are not easily available here. That aside, I am no dumpling sifu. I am very bad with rolling out dough and wrapping the dumplings. I blame it on bad motor skills and fat fingers.

However, I heard about this jiaozi recipe from Chubby Hubby from a lady who had tried it. She claimed that they are not only doable but yields the yummiest of dumplings. So I decided to give it a go. This below was the result of my wrapping and cooking efforts and my husband’s dough rolling and cutting efforts.

20140704-111658-40618348.jpg

Notice the uneven sizing? This is due to us trying out different methods to achive a piece of round dough skin for wrapping. We tried rolling out the pieces with a dowel, pushing it from the middle towards the edge, per the original recipe. Then, we tried rolling it out real thin with the help of lots of extra flour and cutting the skins out with a circular cutter. Haha, obviously the method with the cutter was the easiest and we stuck to that for the rest of the dough. I also changed the method of cooking the dumplings as we fancy something with more texture instead of plain boiling them.

The recipe below is adapted from Chubby Hubby.

Ingredients

For the dumpling skin dough
250g plain flour
125ml cold water

For the dumpling filling
450g minced pork
50g bacon, finely chopped
125ml water
2 tbsp soya sauce
2 tbsp red wine/Shao Xing wine/sherry
1 egg
1 tbsp sesame oil, toasted*
1 tbsp minced ginger, peeled
500g chinese cabbage, blanched, squeezed and chopped
5 stalks spring onion, chopped
Salt and white pepper to taste

Bowl of water, to seal the dumplings
For the dip
Finely julienned ginger strips
Vinegar (Rice or even balsamic vinegar)
Soya sauce

Method

For the dumpling skin dough
1. Using a medium bowl, add in the flour and make a well in the middle. Pour in water gradually. Mixing with a wooden spoon to form a shaggy dough mixture.
2. Transfer dough and leftover flour to a floured surface and knead for 5 minutes until the dough is smooth. Add some flour if dough is too sticky or sprinkle in water if dough is too dry. Form the dough into a ball before wrapping it with clear wrap. Let the dough rest for 30 minutes in room temperature.

For the dumpling filling
1. Meanwhile, in a separate bowl, add in some of the water into minced meat and bacon. Stir the mass with a spoon. Add in soya sauce, wine and somemore water, if needed, to form a sticky mixture. Use only as much water as necessary to form the sticky mixture.
2. Add in egg, sesame oil, minced ginger, chinese cabbage and spring onions. Season with salt and pepper to taste. Once mixed, one can make a test taste by frying a teaspoon of the filling in a hot pan. Make sure the filling is slightly on the salty side as the skin is unsalted.

To complete the dumplings
1. Knead rested dough on a floured surface for another 5 minutes until it is smooth and elastic.
2. Quarter the dough and cover the rest with clear wrap or in a bowl with a piece of cloth. Roll out one quarter of the dough to as thin as possible. If it is too much dough to handle, one can always adjust the amount of dough that is being rolled out. Cut dough with circular cutter of about 7cm. Use flour as necessary.
3. Wrap dumplings by placing one piece of skin on the palm of your hand. Scoop in about 1.5 teaspoons of filling on the skin and fold the dumpling skin to form a crescent. If the dumplings are not sealing easily, wet finger in a bowl of water and run finger along the edge of the crescent (inner side) of the dumpling skin. Moistening just one side before sealing both sides together with your fingers. Place the assembled dumpling on a lined tray. Keep tray covered with cloth as the rest of the dumplings are being assembled.
4. The dumplings can also be frozen at this point. Place tray in freezer. Once the dumplings are individually frozen, you can transfer them into a storage container or ziplock bag. Just cook them with the steps below, without defrosting.

To cook the dumplings
1. Heat a frying pan in medium high heat. Drizzle in oil. Once hot, place in dumplings and pan-fry till the bottom has a sear of golden brown color. Pour in water to cover the base of the pan and cover the frying pan. Let the dumplings steam until the water is nearly all evaporated. Uncover and flip the dumplings. Pan-fry the dumplings till both sides are golden brown and crispy, about another 2 minutes after removal of the cover. Dish up and serve with dipping sauce.
2. To make dipping sauce, combine vinegar and soya sauce in a ratio of 2:1 and add in julienned ginger.

*: I have noticed that sesame oil come in toasted or untoasted forms. For Asian cooking, we use only toasted ones.

Happy dumpling days.

Cheers,
Berenice