Monthly Archives: November 2014

Apple Tart

Standard

The apple “Belle de Boskoop” is my husband’s favorite type of apple. It is a very tart apple and it is said that it contains more Vitamin C than the Granny Smith. He enjoys munching on them and they are good cooking apples. Having received a bag of them from his uncle, I wondered what to do with them that could do justice to my husband’s Boskoop loving soul. In the end I decided to make a tart with. It was delicious.
I followed the recipe from Leite’s Culinaria. The crust was very easy to work with. Assembling was not hard either once all the elements are ready.

IMG_3386.JPG

While I’m not sure if my photography skills did any justice to the pie, I would say I might make it again next Boskoop season 🙂

Simple Lunch

Standard

Asian food here is very different as I know it. The other day I attended a Studio Ghibli Festival Gala at Mannheim. We just wanted to watch the movie “the Legend of Princess Kaguya” but the standard screening was sold out so we bought tickets to the gala which includes a glass of champagne, cosplay competition, Japanese buffet and the movie. My husband had said it will just be sushi. Naively, I pointed out to him that it stated “Japanese buffet”, not sushi buffet. Well, he was right and I was disappointed. I was dreaming of gyozas, assortment of Japanese desserts, yakitori and all that. Ho hum.

And so I’ve begun to wonder what folks think of, if I were to say Chinese food. Here is what I cooked for my toddler and I for lunch yesterday. The lunch consists of garlic stirfried bokchoy, black sesame tuna omelette and buttered tomato rice. Is it very different from what you would have imagined?

IMG_3385.JPG

Would anyone be interested to learn how to make such simple home cooked fares? 🍀

Oven Baked Blueberry Pancake

Standard

We have been plagued by a nonstop case of cold, runny noses and coughing this whole month. Today is another day of me feeling weak and exhausted. I have a toddler to feed so I looked around for something that is easy and contains fruits/vegetables. The internet led me to Martha Stewart’s page and showed me a very easy recipe of oven-baked blueberry pancake. The ingredients are all there so that decided it.

I do not own any cast iron pan so I used my springform cake pan which worked fine. I need not adjust the timing or anything. The pancake was simple but good. I drizzled some maple syrup over before serving. Yum! The little one devoured his serving and asked for a second and a third serving 🙂

IMG_3351.JPG
For the recipe, please click here.

Japanese Candied Sweet Potato/Daigaku Imo

Standard

Sweet potatoes are not so easily available here as that I can go out to the supermarket any day with a guarantee to come home with some. The common available variety seems to be imported from the USA and has an orange flesh. I was very happy to find a different type the other day and this type has purple skin with yellow flesh. Reminds me of Japanese sweet potatoes! Despite the physical similarity, the ones I bought came from Portugal. And since me being terrible with botanical and agricultural knowledge, I can’t tell them apart. Terrible, terrible, terrible.

I didn’t mind. I was happy to have some sweet potatoes to play with in the kitchen and decided to try my hand on making candied sweet potatoes. I’ve eaten them before at a small Japanese bar/restaurant in Singapore. I liked it very much. It was during our last month there. A return visit was at that point impossible to squeeze in.

Daigaku Imo, which translates to university potatoes, are enjoyed by students in autumn, according to Japan Centre. My timing to attempt them was perfect as it is autumn now.

So, here is to revisiting another memory 🙂

IMG_3350.JPG

The recipe is from justonecookbook. It is very easy to make and the instructions are detailed and easy to follow. For the recipe, please click here.

30 Min Homemade Rye Pizza

Standard

These days, with a picky toddler, pizza can be my best bet sometimes. Today’s lunch was one of those days. It was not planned for so I wondered if there is such a thing as a quick pizza dough. It turned out to be a very positive “yes”. This pizza from start to end took me 30 minutes. I have substituted the bread flour with rye flour. My toddler did not mind it 🙂 I think it has to do with the salami. Oh boy, I have to tell myself, too much of a good thing is really not good. Don’t mind the weird shaping too!

IMG_3189.JPG

The dough recipe is adapted from Allrecipes. The serving size can be changed at the Allrecipes link so you can double, triple, quadruple the amount of dough 🙂

Makes 1 small pizza (Enough to feed a toddler and an adult)

Ingredients
For the dough
3g dry yeast
1 tsp sugar
60ml warm water
85g rye flour/bread flour
1/2 tsp salt
1.5 tsp olive oil
For the sauce
1 tomato, pureed (with blender)
1 tsp pizza herbs/oregano
2 tsp olive oil
For the toppings
Sliced salami
Shredded cheese of your choice
Toppings of your choice

Breadcrumbs and extra flour for dusting

Method
1. Preheat oven to 200 degrees Celcius (with fan). Gather all dry ingredients for the pizza dough and place them into a medium bowl. Stir in water and oil until a smooth dough forms. Leave it for 5 mins.
2. Prepare baking tray by sprinkling a handful of breadcrumbs all over. Prepare sauce by heating up a small saucepan and adding in olive oil. Add in the pureed tomato and herbs and bring to a boil. Simmer for 2-3 minutes till it thickens. (It’s a fairly fast process)
3. On a floured surface with floured hands, pat out the dough. If the dough looks wet and sticky sprinkle some flour over it for better handling. Pat it out as thin as possible and transfer it to the baking tray. Place the dough on top of the breadcrumbs.
4. Spoon/spread the sauce all over the dough, leaving a 1 cm or 1/4 inch border on the sides. Sprinkle as much cheese as you would like and the toppings of your choice. Bake in preheated oven on the higher rack (mine as 4 racks, I used 2nd from top rack) for 10 – 15 mins or till the cheese has melted and turn light golden brown.

That was today’s QUICK and yummy lunch 😉

Pineapple Fried Rice

Standard

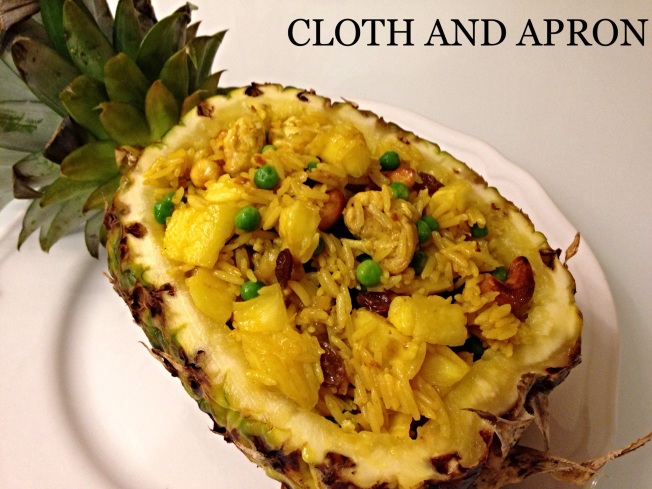
One of my favorite dishes to order at our favorite Thai restaurant back in Singapore was pineapple fried rice. I have yet to see this dish on the menus of the Thai restaurants here so I have decided to give try making pineapple fried rice last week.

IMG_3127.JPG

The recipe is adapted from the blog, Guai Shu Shu. I referenced the cutting of the fruit from about.com. The detailed instructions and pictures helped a lot. And for me, a serrated knife/bread knife is the best choice not only for outside but to cut out the insides of the pineapple too. I used a regular spoon to scoop everything out and reserved the amount I needed for the fried rice while the rest went into a fruit salad. Please do not fret about getting perfect cubes out. It didn’t happen for me either.

Ingredients
2 shallots/1 small onion, finely chopped
1/4 cup raisins
1/2 cup cashew nuts
1 cup frozen green peas
1 chicken breast, cut into small cubes, lightly coated with cornflour
2 cups cooked white rice (leftover rice or freshly cooked but with slightly less water than usually called for)
1 cup pineapple cubes, with juice
1 loose tablespoon turmeric
3 tbsp fish sauce
1 tbsp soya sauce
Water
Cooking oil

Method
1. Heat a wok with medium high heat for 2 mins. Swirl in 2 tablespoons of oil. Once the oil is easily spreadable and forms “lines”, shallow fry the cashew nuts till golden. Scoop up, drain and set aside.
2. Let the wok reheat for 1 minute. Add in chicken cubes. Sear the chicken till light golden brown on both sides before removing. Sear for 1 minute on one side and flip it over with the spatula for the other side. Scoop up, drain and set aside.
3. Add 1 tablespoon of oil into the wok. Add in the shallots. Stir fry till fragrant before adding in the turmeric powder. Mix the turmeric and let it mingle among the shallots. Add in the rice. Add at this point the pineapple juice and a dash of water (about 2-3 tablespoons). Quickly push down the spatula and flatten and spread the rice. Stir fry, flatten and spread is the continuous action until all the rice are coated yellow. The juice and the water helps moisten the rice and increase the spreadability of the rice. It also helps to continue cooking the rice to render it al dente. At this point, the moisture should have nearly all been evaporated.
4. Once coated, add in the sauces, chicken, pineapple cubes and peas to mix. Stir fry and toss vigorously to get everything evenly mixed together. Once everything is heated through, add in the raisins for a couple of final tosses. Switch off the heat. Carefully fill up the pineapple boat with the fried rice and garnish with your choice of topping, coriander or store bought crispy shallots.

*Note: For the rice, I made it fresh on the day itself. Cooked the rice one hour earlier using 20% less water and once done and flaked, I let it air until I am ready to use it.
** Note: When preparing the pineapple boat, it is better to rinse the whole pineapple under water as there are always small bits everywhere.
***Note: If one prefers to have some heat in the fried rice, do add in a sliced chilli or two together with the peas.

Cakey, chewy, slightly gooey Brownies

Standard

I haven’t had much cravings for brownies for the longest of times. Those days I would wonder why people go crazy for brownies. I could remember my first brownie though. It was chocolatey and moist. First bite and I went “wow!” But the years that follow, I lost clue on the brownie loving. Till last week.

I had a strong urge after dinner for something chocolatey. Gooey. Cakey. A couple of thoughts later, I narrowed down the suspect. The brownie. I have no recipe on hand to make one. So I searched for one quickly. Found one on Allrecipes (Click on Allrecipes for the recipe!) and 45 minutes later, I was in brownie heaven. So good that it’s a keeper.

IMG_3059.JPG

Broccoli with Egg Sauce

Standard

When I made the dish, Three-Cup Chicken (click here if you would like to see the recipe of Three-Cup Chicken), I also made a vegetable dish to go with it. It’s a standard practice for me. Something for protein together with something green. That night, I was inspired to try broccoli with egg sauce.

IMG_3148.JPG

Ingredients
1 small broccoli, trimmed to florets
1 egg, beaten
Chicken stock granules
Water

Method
1. Fill a pot with enough water to blanch the broccoli in. Bring to a boil and add in broccoli. Boil the broccoli until it has cooked to the consistency of your choice. We cook it a little bit after al dente as it is the preference of our child. That would take about 4 minutes. When unsure, fish one floret out and take a bite.
2. Once done, remove broccoli and pour away the water. Reserve only enough water for the amount of sauce you would want to have. To the same pot, add in chicken stock granules, amount per packaging instruction. I added a teaspoon.
3. When the stock returns to a boil, pour in the egg. While pouring slowly, use a fork to swirl the egg in the water. If you prefer to thicken the sauce more, dissolve a teaspoon of cornstarch with a teaspoon of water and add in. Stir to make sure the starch is incorporated. Turn the heat off.
4. Arrange florets on a circular pattern. Once a circle is established, add the florets on top to make a mini well. Pour egg sauce in the middle and serve.

Note: I did not use any extra salt in the sauce. If you prefer, do add salt or soya sauce per preference. I did not as the other dish was very flavorsome. I wanted something to balance things out.

Three-Cup Chicken 三杯鸡 (Sanbeiji)

Standard

My heritage is of Chinese-Malaysian and it is important for me to pass that down to my son who is of Chinese-Malaysian and German heritage. Food-wise, there will be a minimum of one chinese/asian meal per week at home. A couple of nights ago, I attempted the three-cup chicken dish. This recipe is a very popular Taiwanese dish. According to Wikipedia, it originates from the Jiangxi province in China. (Please click here for the read up). It requires only a few ingredients but it is an extremely flavorful dish. The name “Three-cup” is explained by the recipe calling for equal amounts of soya sauce, sesame oil and cooking wine. I think it is quite an easy recipe to remember. The other ingredients used are ginger, garlic, basil leaves and of course, chicken. When serving this dish, do prepare more jasmine rice than usual as the sauce goes wonderfully well with rice.

IMG_3149.JPG

Ingredients
2 chicken breasts, cut to big cubes
4 slices of ginger, peeled
5 cloves of garlic, peeled
1/4 cup sesame oil
1/4 cup soya sauce
1/4 cup cooking wine
2.5 Tbsp sugar
1 chilli, sliced (optional)
Large handful of basil (normal basil or Thai basil)
Corn flour for coating chicken meat

Method
1. Lightly coat chicken with corn flour. Do pat dry the meat with a kitchen towel if it’s wet.
2. Heat 1/8 cup sesame oil in large frying pan/wok over medium high heat. Add and fry ginger and garlic till slightly browned. Add chicken and sear the meat till golden.
3. Add cooking wine, soya sauce and sugar. Stir to dissolve the sugar. Reduce heat to a simmer and partially cover. Stir the meat constantly to keep it coated with the sauce. Simmer continuously for 15-20 mins until the meat is cooked through and the sauce has thickened. Switch off the heat.
4. Add in basil leaves and chilli (if using), tossing them in to get them mixed in. Cover for a few minutes to infuse. Dish up and serve.

Acknowledgement: This recipe is a shared recipe which was shared within a Facebook cooking group that I belong to.